How to Know the Right Time to Harvest Rice
How to Know the Right Time to Harvest Rice: A Farmer’s Guide to Reading the Grain, Not the Calendar
I harvested a paddy too early once, convinced by how golden the field looked from the bund that it had to be ready, only to mill that batch later and find a disappointing amount of chalky, broken grain instead of the clean, translucent kernels I was expecting. The field had looked ready. It wasn’t. Rice, I learned that season, can look finished from a distance while the individual grains are still a week or more away from where they actually need to be. These days I don’t trust the color of the field alone for anything. I walk in, pull actual panicles, and check the grains themselves, because that’s the only thing that’s ever told me the truth without exception in the fifteen-plus years I’ve been growing this crop.
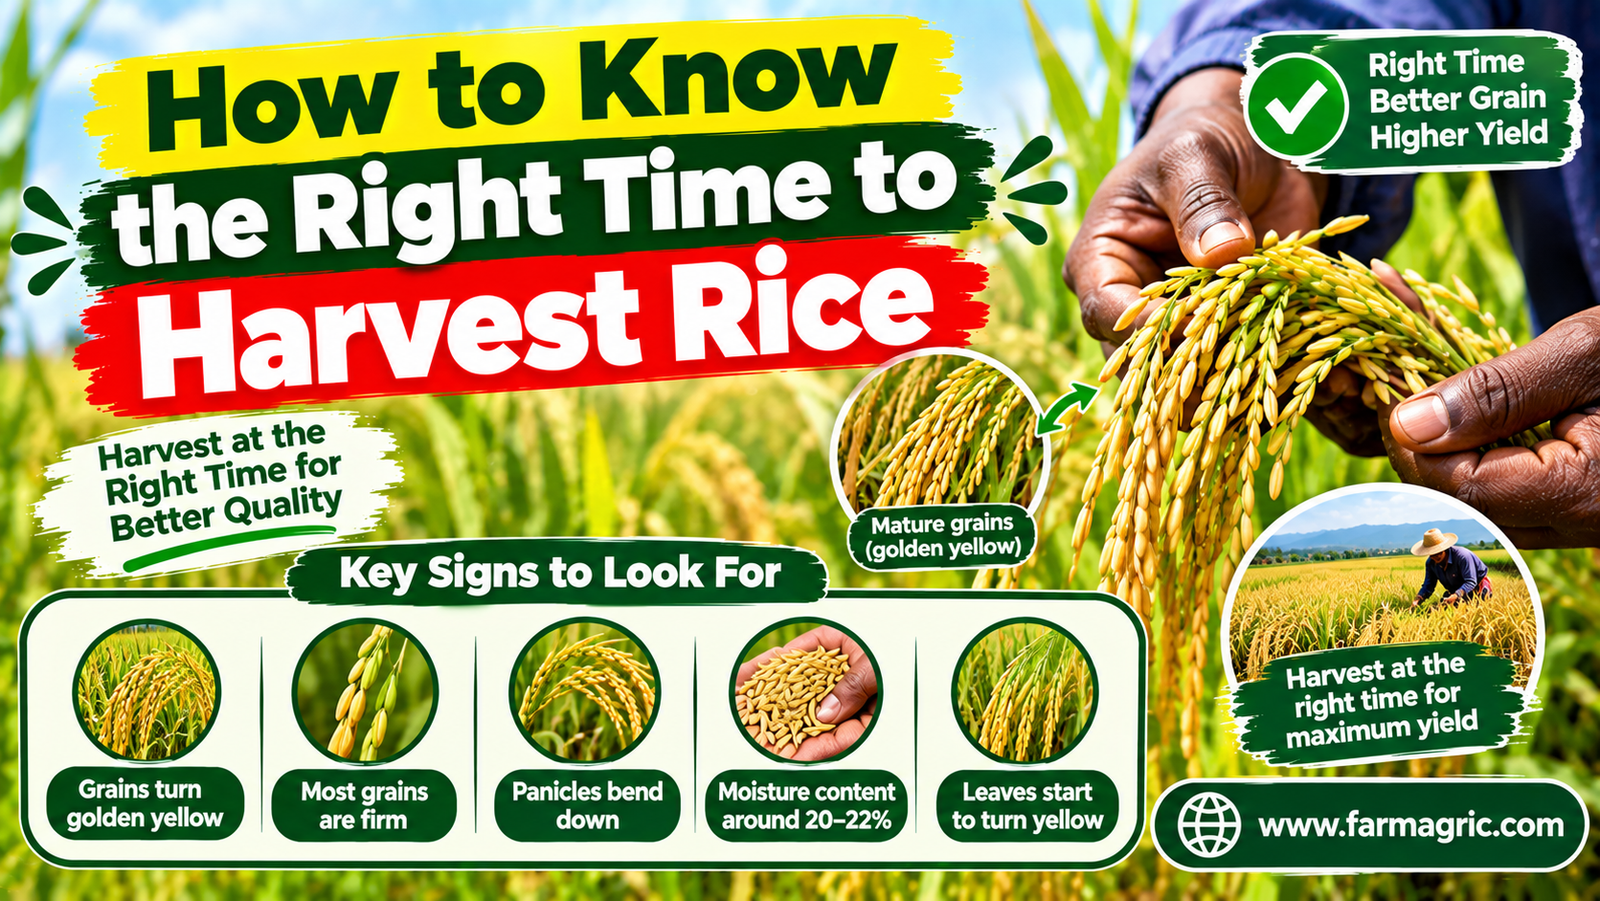
So let me answer you straight, because I know you’re looking at a field that’s turning that golden color and wondering if this is the week. Rice is ready for harvest when roughly 80 to 85 percent of the grains on a panicle have turned a straw-yellow color and feel hard rather than soft or milky when pressed between your fingers, which typically happens about 30 to 35 days after full flowering, and waiting for 100 percent yellow grain usually means you’ve already lost quality and yield to shattering and lodging by the time you cut. The overall field color is a useful early signal, but it’s the individual grain, checked directly by hand from multiple panicles across the field, that actually tells you whether it’s time, the same way the kernel decides maize harvest timing rather than the husk alone.
Why Grain Color and Hardness Matter More Than Field Color
A rice field can look uniformly golden from the road while grains at different positions on the same panicle, and different panicles across the same field, are at genuinely different stages of maturity. Grains at the base of the panicle mature earlier than grains at the tip, so a panicle can appear mostly yellow while a meaningful percentage of grain, especially near the tip, is still in a soft, milky, or doughy stage internally. Harvesting based purely on how the field looks from a distance, without checking individual grains, is exactly what cost me that chalky, broken batch, since the color had gotten ahead of the actual internal maturity of a significant portion of the grain.
What Most Farmers Get Wrong
The first mistake, the one that fooled me completely that first bad season, is judging readiness by overall field color alone rather than checking individual grain hardness and color directly. The field can look done a full week or more before the grain actually is, and that gap costs real milling quality even if the yield weight looks fine at harvest.
The second mistake is waiting too long out of caution after being burned by an early harvest once, then swinging too far the other direction and losing yield to shattering, where mature grains drop from the panicle before or during harvest, and to lodging, where the heavy, fully mature crop falls over in wind or rain and becomes far harder to harvest cleanly.
The third mistake is harvesting purely by a fixed number of days after transplanting without accounting for how weather variation that specific season shifted the actual maturity timeline. A cooler season or one with unusual temperature swings can push grain maturity later than the variety’s typical days-to-maturity would suggest, and relying on the calendar alone misses that shift.
The fourth mistake is not checking multiple panicles from different parts of the field before deciding the whole field is ready. Maturity can vary meaningfully across a paddy due to differences in water depth, soil fertility, or even slight differences in transplanting date if the field wasn’t planted in a single pass.
The fifth mistake is ignoring moisture content entirely and relying purely on visual and hand-feel assessment, particularly when there’s any access to even a basic moisture meter. Grain moisture at harvest has a real, measurable impact on both immediate milling quality and how much additional drying will be needed before safe storage.
Step-by-Step: How to Determine the Right Rice Harvest Time
1. Track flowering date as your starting reference point. Note when the majority of the field reaches full flowering, since most rice varieties reach harvest maturity roughly 30 to 35 days after this point, giving you a reliable window to start checking grain condition directly rather than guessing blind.
2. Begin checking individual grains about a week before your expected harvest window. Starting early lets you track the actual progression of maturity in your specific field this season, rather than only checking once and hoping you’ve hit the right moment by chance.
3. Pull several panicles from different parts of the field. Sample from at least four or five different areas of the paddy, since maturity can vary across the field due to water depth differences, soil fertility variation, or slight differences in effective transplanting date.
4. Check the grain color across the full panicle, not just the base. Look at the percentage of grains that have turned straw-yellow across the entire panicle, including the tip, since tip grains mature last and give you the most honest picture of whether the panicle as a whole is truly ready.
5. Press grains between your fingers to check hardness. A mature grain feels firm and hard, resisting pressure, while an immature grain feels soft or releases a milky or doughy substance when pressed. Aim for roughly 80 to 85 percent of grains on a sampled panicle showing this hard, straw-yellow condition before considering the field ready.
6. Check grain moisture content if you have access to a meter. For most milling purposes, harvesting at around 20 to 24 percent moisture content gives the best balance between minimizing field losses from waiting too long and avoiding the quality problems that come from harvesting too wet, with drying handled afterward to bring it down to safe storage levels around 13 to 14 percent.
7. Watch the lower stem and leaves as a secondary confirmation. As rice approaches full maturity, the lower leaves typically yellow and begin to senesce naturally, and the stem below the panicle starts to show some yellowing as well, though this should be used to confirm what the grain itself is already telling you, not as your primary indicator.
8. Factor in weather forecasts before finalizing your harvest date. If your grain sampling shows the crop is at or very near ready and rain or strong wind is forecast, harvesting slightly earlier rather than risking lodging or grain shattering from a storm is often the better trade-off, even if it means accepting a very small percentage of slightly immature grain.
9. Harvest promptly once the 80 to 85 percent threshold is confirmed. Don’t wait for 100 percent of grains to reach the straw-yellow, hard stage, since by that point the earliest-maturing grains, particularly at the base of the panicle, have often already begun shattering and dropping, and the crop becomes increasingly vulnerable to lodging the longer it stands fully mature in the field.
Warning Signs You’re Past the Ideal Harvest Window
Grains dropping from the panicle when you simply brush your hand across it, without any deliberate effort to remove them, is a clear sign of shattering already underway, meaning yield is actively being lost with every additional day the crop stands uncut. Stems bending or lodging over, especially after any wind or rain, once the crop has reached full maturity, signals that further delay risks a much harder and less clean harvest, since lodged rice is significantly more difficult to cut efficiently and often picks up more field losses in the process. A noticeable increase in bird damage to the grain heads is often a practical, if frustrating, sign that the crop has been sitting at peak palatability for longer than ideal. And grain that shows visible cracking or an overly dry, brittle quality when checked by hand indicates the crop has moved past the ideal harvest moisture range, increasing the risk of broken grain during the harvesting and milling process itself.
What I’d Do Differently If Starting Again Today
If I were starting over, I’d check individual grain hardness and color from my very first harvest instead of trusting the golden look of the field the way I did that first disappointing season. I’d track flowering date deliberately every season as my reference point, rather than only thinking about harvest timing once the field already looked visually close, since that earlier tracking gives me a much more reliable window to start actual grain sampling. I’d also sample from several different areas of the field every time rather than checking just one convenient spot near the edge, since I’ve since learned how much maturity can genuinely vary across a single paddy depending on water depth and fertility differences I hadn’t accounted for early on. And I’d trust the 80 to 85 percent threshold instead of waiting for the field to look completely, uniformly golden, since that extra week of waiting for perfection has cost me more to shattering and lodging over the years than it ever gained me in additional ripening.
Frequently Asked Questions About Rice Harvest Timing
How many days after flowering is rice ready to harvest?
Most varieties reach harvest maturity roughly 30 to 35 days after full flowering, though this can shift by several days depending on temperature and weather conditions during that specific season, which is why checking the grain directly rather than relying on days alone gives a more reliable answer.
What percentage of grains should be yellow before harvesting rice?
Aim for roughly 80 to 85 percent of grains on a sampled panicle to have turned straw-yellow and feel hard when pressed, since waiting for 100 percent maturity typically means losing yield to shattering and increased lodging risk in the earliest-maturing grains.
Can I harvest rice too early, and what happens if I do?
Yes, harvesting before enough grains have reached full maturity results in a higher percentage of chalky, immature, or broken grain after milling, along with lower overall yield weight, since immature grains haven’t reached their full dry weight potential yet.
What moisture content is ideal for harvesting rice?
Around 20 to 24 percent moisture content at harvest generally provides the best balance between minimizing field losses and avoiding excessive quality problems, with further drying afterward bringing the grain down to a safe storage level of roughly 13 to 14 percent.
Why does rice sometimes look ready from a distance but isn’t actually mature?
Grains at the base of a panicle mature earlier than grains at the tip, so a field can appear uniformly golden overall while a meaningful percentage of grain, particularly near the panicle tips, is still soft or milky internally, which is why direct hand-checking of individual grains matters more than field color alone.
If there’s one thing I want you to remember from all this, it’s that the field will always look more finished from a distance than it actually is up close, so walk in, pull a panicle, press a grain between your fingers, and let the kernel tell you the truth the color from the bund never quite manages to.