How to Cut Seed Yams Without Reducing Yield
How to Cut Seed Yams Without Reducing Yield: A Farmer’s Guide to Making Every Piece Count
I remember a season early in my yam farming years when I cut my seed yams the way I had watched my father do it for as long as I could remember, hacking a large tuber into whatever number of pieces seemed reasonable for the amount of land I had to plant, without paying much attention to where on the tuber each piece came from or how much skin and flesh surrounded the eyes I was relying on to sprout. That season gave me a field with wildly uneven emergence, some mounds sprouting strong and vigorous within two weeks, others taking a month or more, and a noticeable number that never sprouted at all. When I finally sat down with an older farmer in my area and walked him through exactly how I had been cutting, he pointed out several mistakes in the first five minutes that I had been repeating for years without ever connecting them to my patchy stands and disappointing yields.
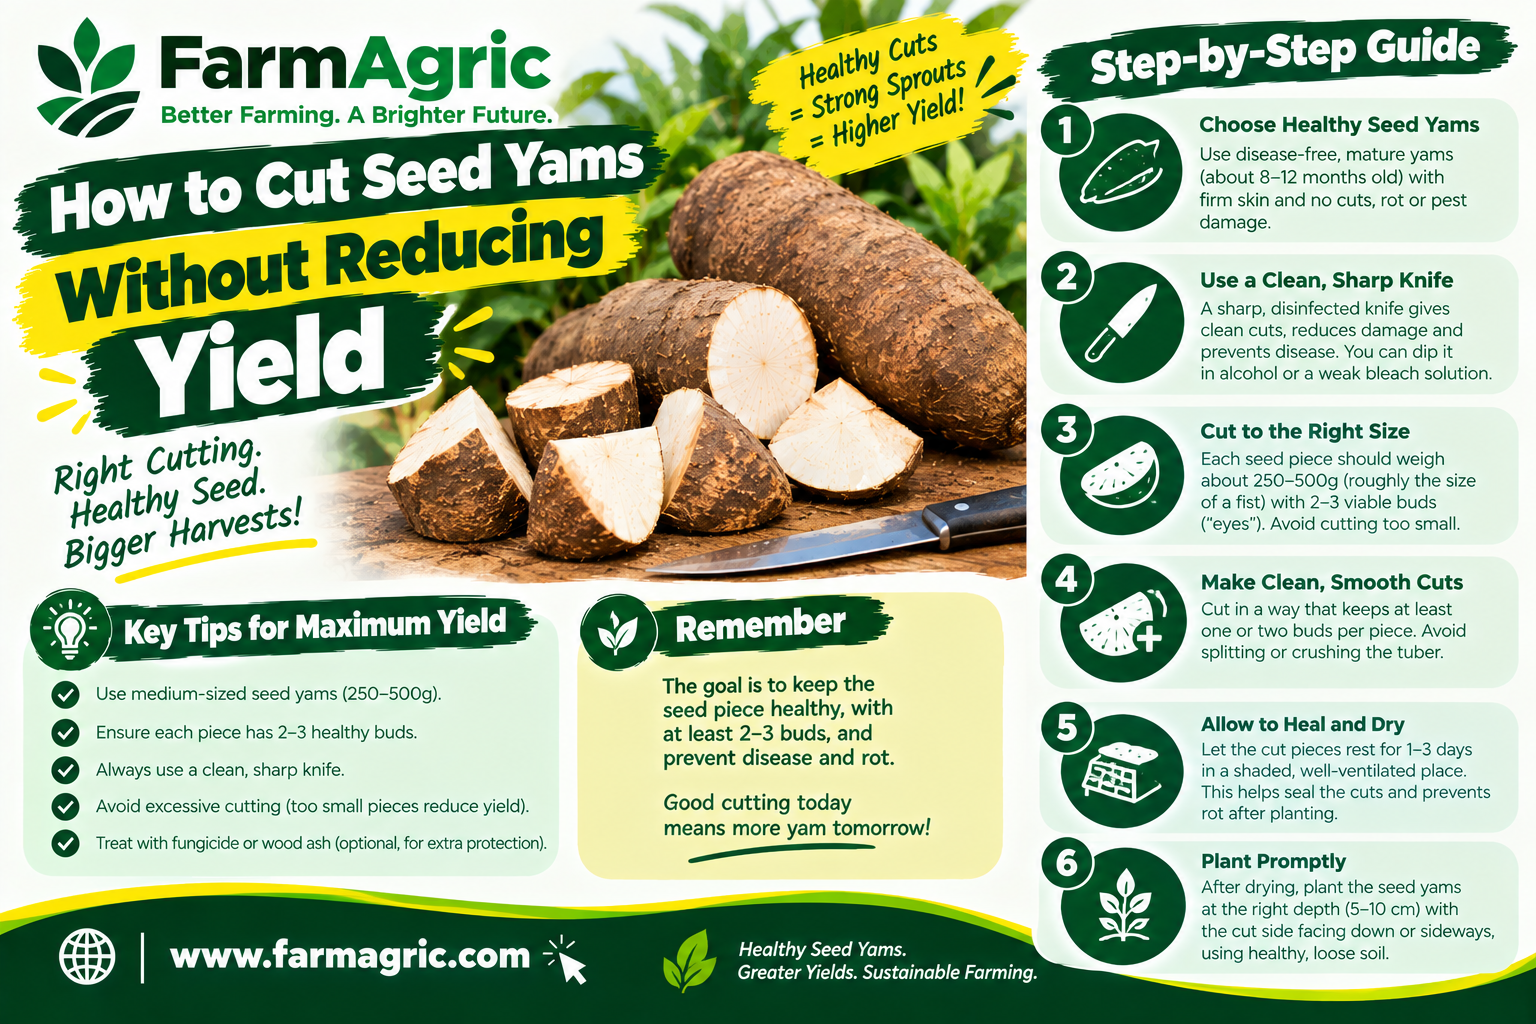
So let me answer you straight, because I know you are standing over a pile of seed yams right now trying to figure out how to cut them without wasting good planting material or setting yourself up for a poor stand. You cut seed yams without reducing yield by using only healthy, disease-free tubers as your source material, cutting pieces of adequate size, generally two hundred to two hundred and fifty grams for most varieties, ensuring each piece carries enough flesh and at least one good eye or node, cutting with a clean, sharp, disinfected knife to avoid spreading disease between tubers, and curing the cut pieces properly before planting so the wound has time to heal over and reduce the risk of rot once the piece goes into the soil. The size and quality of your seed piece, combined with how carefully you handle the cutting and healing process, has a direct and measurable effect on how reliably that piece sprouts and how vigorously the resulting plant grows, which ultimately shows up in the size of the tuber you harvest from it many months later.
Why Seed Piece Quality Matters So Much in Yam
Unlike crops grown from true seed, yam is propagated almost entirely from pieces of the tuber itself, which means the seed piece you plant is not just a trigger for germination the way a grain seed is, it is also the plant’s primary energy reserve during its earliest and most vulnerable weeks of growth before its own root system and leaves are established enough to support themselves. A seed piece that is too small, damaged, poorly cut, or taken from an unhealthy parent tuber simply does not have enough stored energy or healthy tissue to support strong, reliable sprouting and early growth, and a plant that starts weak from an inadequate seed piece often struggles to fully catch up even if conditions improve later in the season. This is fundamentally different from how many other crops handle a rough start, and it is exactly why the care taken at the cutting stage, months before any visible growth appears, has such an outsized effect on the final harvest.
What Most Farmers Get Wrong
The first mistake, the one I inherited without question from watching my father, is cutting pieces inconsistently in both size and location on the tuber, without any real system for ensuring each piece has adequate flesh and a reliable eye or node, simply dividing the tuber into however many pieces felt reasonable for the planting area available.
The second mistake is using a dull or dirty knife, or using the same knife across many tubers without any cleaning in between, which both makes cutting more difficult and increases crushing damage to the tissue, and more seriously creates a direct pathway for spreading disease organisms from an infected tuber to healthy ones through the blade itself.
The third mistake is skipping or rushing the curing period after cutting, planting seed pieces immediately while the cut surface is still fresh and moist, rather than allowing time for that wound to dry and form a protective layer before the piece goes into the ground where soil organisms can easily enter through an unhealed cut.
The fourth mistake is using visibly diseased, damaged, or rotting tubers as a source of seed pieces simply because they are available and it feels wasteful not to use them, not recognizing that disease present in the parent tuber very often carries directly into the resulting plant, undermining the whole season’s investment from the very first piece cut.
The fifth mistake is cutting pieces too small in an effort to stretch limited planting material across more land, not accounting for how directly seed piece size affects the amount of stored energy available to support early growth, and often ending up with a larger number of weak, poorly established plants rather than a somewhat smaller number of strong, well-established ones.
Step-by-Step Guide to Cutting Seed Yams Properly
Start by selecting only healthy, disease-free tubers as your source material, inspecting each one carefully for any sign of rot, soft spots, unusual discoloration, or pest damage before it ever goes near a cutting knife. A tuber that shows any of these signs should be set aside for immediate consumption or discarded rather than used for seed, since planting a piece from a compromised tuber very often means planting the problem directly into your new crop.
Choose tubers of a reasonable size and quality, generally favoring medium-sized, healthy tubers over either the very largest or the smallest available, since very large tubers, while they can be cut into more pieces, sometimes come from plants that prioritized size over the vigor and disease resistance you actually want passed into your seed pieces.
Clean and disinfect your cutting tool before you begin, using a sharp knife or cutlass wiped down with a disinfecting solution, and keep that disinfecting process going throughout the cutting session, wiping the blade clean between tubers or at minimum whenever you notice any sign of disease on a tuber you have just finished cutting, since this single habit does more to prevent disease spread through your seed stock than almost anything else in the process.
Cut pieces to an adequate size, generally in the range of two hundred to two hundred and fifty grams for most varieties, which is roughly the size of a modest fist, adjusting somewhat based on your specific variety’s typical tuber size and local recommendations where available. Resist the temptation to cut smaller pieces simply to stretch your seed stock further across more land, since undersized pieces consistently produce weaker, less reliable stands than properly sized ones.
Ensure each piece includes an adequate amount of healthy flesh surrounding at least one good eye or node, since the eye is where sprouting will actually begin, but the surrounding flesh is what feeds that initial sprout and the early root development that follows before the plant can support itself independently.
Cut with clean, decisive strokes rather than sawing or crushing the tissue, since a clean cut heals and cures more reliably than a ragged, crushed one, which provides more entry points for soil organisms and heals more slowly and unevenly once planted.
Dust cut surfaces with wood ash immediately after cutting where this is a locally available and traditional practice, since ash helps dry the cut surface and has some natural properties that discourage rot organisms during the curing period that follows.
Spread cut seed pieces in a single layer in a well-ventilated, shaded area, cut surface facing upward where practical, allowing air to circulate freely around each piece rather than piling them together, which traps moisture and encourages rot exactly where you are trying to encourage healing instead.
Cure the pieces for several days to about a week before planting, depending on your local climate and humidity, checking periodically that the cut surface is drying and forming a protective layer rather than remaining moist or showing any sign of developing rot. In more humid climates, this curing period may need to extend somewhat longer to ensure the surface has genuinely sealed before the piece goes into wet soil.
Inspect cured pieces again just before planting, setting aside any that have developed soft spots, discoloration, or an off smell during the curing period, since these are signs that rot has set in despite your earlier precautions, and planting a piece showing these signs wastes both the planting effort and the space in your field that a healthy piece could have used instead.
Plant cured seed pieces with the cut surface oriented according to local practice and variety recommendations, typically with the cut side either facing downward into the planting hole or positioned to minimize direct soil contact with the healed wound, depending on the specific guidance for your growing area and yam type.
Space your planting according to variety and soil fertility recommendations, giving each seed piece and the resulting plant adequate room to develop a full root system and tuber without excessive competition from neighboring plants, since even a well-cut, well-cured seed piece can underperform if crowded too tightly against its neighbors later in the season.
Warning Signs to Watch For
A cut surface that remains wet, slimy, or does not appear to be drying normally during the curing period is an early warning that rot may be establishing itself in that particular piece, and pieces showing this sign should be set aside and not planted alongside healthy, properly cured material. A sour or unpleasant smell developing from a cut seed piece during curing, distinctly different from the neutral smell of a healthy piece, often confirms that bacterial or fungal breakdown has begun and that piece is no longer suitable for planting. Discoloration spreading outward from the cut surface into surrounding flesh, rather than the surface simply drying and lightly browning as part of normal healing, suggests active rot progressing into tissue that initially appeared healthy at the time of cutting. Uneven or delayed sprouting across a newly planted field, with some areas emerging strongly within two to three weeks and others lagging well behind or failing to emerge at all, often traces back to inconsistent seed piece size or quality rather than any problem with the soil or planting conditions themselves. And a field with a noticeably higher proportion of weak, small, or non-emerging plants in sections planted with pieces cut late in a cutting session, after a knife may have accumulated disease organisms from earlier tubers without adequate cleaning in between, points directly toward a disease transmission problem during the cutting process itself.
What I’d Do Differently If Starting Again Today
If I were starting over, I would never again cut seed pieces inconsistently the way I did in those early years, simply dividing tubers into whatever number of pieces matched my planting area without real attention to size, flesh amount, or eye placement, since that patchy, uneven field taught me directly how much those details actually matter. I would disinfect my cutting knife as a strict, non-negotiable habit between tubers from the very first season, rather than only adopting this practice after that conversation finally connected my disease problems to a cutting process I had never thought to question. I would commit to a proper curing period every single time, resisting any pressure to plant immediately after cutting simply because the rains had arrived or because I wanted to finish planting quickly, since I now understand how much that brief waiting period protects the investment represented by every single seed piece I cut. And I would be far more willing to discard a questionable tuber entirely rather than stretching it into seed pieces out of reluctance to waste anything, since I now know that a weak or diseased seed piece very often costs more in reduced yield than the value of the tuber I was trying not to waste in the first place.
Frequently Asked Questions About Cutting Seed Yams
What is the ideal size for a seed yam piece? Most varieties perform best with pieces weighing roughly two hundred to two hundred and fifty grams, about the size of a modest fist, since this generally provides enough stored energy to support strong, reliable sprouting and early growth without wasting more planting material than necessary on oversized pieces.
Does every seed yam piece need an eye to sprout successfully? Yes, each piece should contain at least one healthy eye or node, since this is where sprouting actually begins, and a piece of flesh without any eye present will not produce a plant regardless of how much healthy tissue surrounds the missing eye.
Why do seed yam pieces need to be cured before planting? Curing allows the cut surface to dry and form a protective layer before the piece is exposed to moist soil, significantly reducing the risk of rot setting in through the fresh wound during the vulnerable early period before the plant has established itself.
Can I use a diseased yam tuber for seed if I just cut away the bad part? This is risky, since disease organisms often extend further into the tuber than is visible from the outside, meaning a piece cut from a tuber that showed disease symptoms elsewhere may still carry the problem even if the specific piece cut looked clean at the time, making healthy source tubers a safer and generally more reliable choice.
How long should cut seed yam pieces be cured before planting? Most climates call for several days to about a week of curing in a shaded, well-ventilated area, though more humid conditions may require a somewhat longer curing period to ensure the cut surface has genuinely dried and sealed before the piece goes into wet soil.
If there is one thing I want you to remember from all this, it is that every seed yam piece you cut is carrying the entire early life of the plant it will become inside that one chunk of flesh, so give it enough size, a clean cut, a healthy parent tuber, and the time to heal properly before it ever touches the soil, because the farmer who treats the cutting stage as seriously as the harvest stage is the one who stops wondering, months later, why some mounds sprouted strong while others barely sprouted at all.
SEO Title Tag (under 60 characters): How to Cut Seed Yams Without Reducing Yield