How to Store Yam for Months Without Spoilage
How to Store Yam for Months Without Spoilage
Every year, a farmer near me fills his barn in December and sells out in February because he is scared of losing the crop. Every year, I watch him sell at the lowest price of the season, while I wait for the dry months when yam is scarce and buyers argue over tubers. The difference is not luck. I learned long ago that yam kept well for five or six months can earn nearly double what the same yam earns at harvest. The trick is keeping it alive that long.
Here is the direct answer. To store yam for months without spoilage, harvest only fully mature, undamaged tubers late in the season, cure them in the shade for several days, tie or rack them so each tuber has air on all sides, keep them in a shaded, well-ventilated, rodent-proof barn, remove sprouts as they appear, and inspect every week to pull out any tuber that softens, molds, or smells. Long storage is not one big step. It is a chain of small habits, and any weak link can cost you the whole barn.
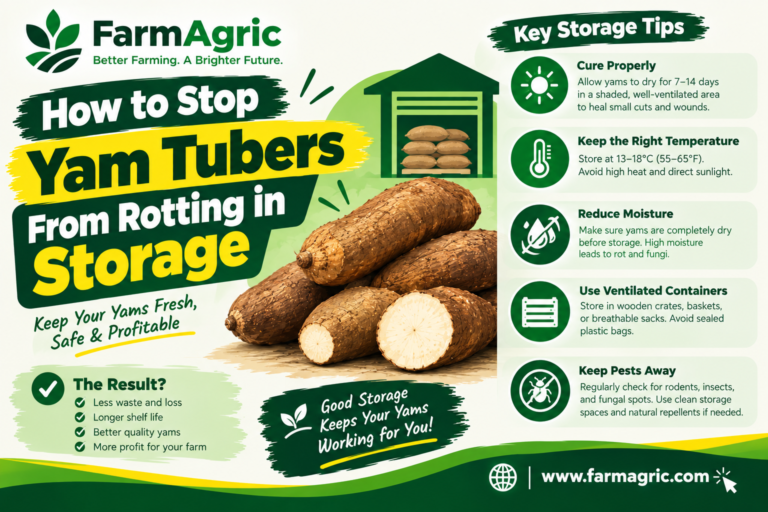
If you want the basics of why yam rots, I covered that in my article on stopping yam tubers from rotting in storage. This one is about the long game: how to plan, build, and manage a barn so the crop lasts for months.
What Most Farmers Get Wrong About Long Storage
The biggest mistake is storing the wrong yam. Not every tuber deserves a place in the barn. Early-harvest tubers, cut tubers, bruised tubers, and tubers from sick plants will not last. Farmers fill the barn with everything they dug and then wonder why the losses are heavy. I store my best 60 percent and sell the rest fast.
The second mistake is treating storage as something that starts after harvest. It starts in the field, with clean seed, good soil, rotation, and a harvest date that lets the skin harden. A tuber dug too soon is thin-skinned, watery, and short-lived.
The third mistake is building a barn that looks good but breathes badly. A closed, hot barn with a low roof is an oven. Yam gives off heat and moisture as it breathes, and that has to leave the barn.
The fourth mistake is setting up the barn once and forgetting it. Yam in storage is alive. It loses weight, it ages, it sprouts, and it can be attacked by rats, termites, and rot. A barn that is not checked is a barn that is failing slowly.
The fifth mistake is storing everything for the same length of time. Different tubers, varieties, and conditions age differently. I plan to sell the weaker stock first and keep the strongest for last.
Know How Long Yam Can Really Last
Storage life depends on the variety, the harvest time, the handling, and the barn. As a rough guide from my own experience, well-handled, late-harvest tubers of good storing varieties can stay sound for 4 to 6 months, and sometimes longer. Poorly handled tubers in a hot, closed barn can fail within weeks. Some varieties store much better than others, so ask your extension officer and neighbors which ones hold up best in your area, and keep your own records.
Even in good conditions, yam loses weight over time through breathing and water loss, and it eventually breaks dormancy and sprouts. You can slow these processes, but not stop them. So the goal is not forever. The goal is to hold the crop until the price is right, then sell before quality drops.
Step 1: Win the Battle in the Field
Good storage begins before you dig.
Use clean, healthy seed and rotate your fields. Tubers carrying virus, nematode damage, or rot do not store well. Rotating with cereals or legumes reduces soil pests and disease.
Let the crop mature. For storage, I wait until the vines have dried and the skin of the tuber is firm and set. Harvesting while the vine is still green and the skin is tender gives you tubers that rot and shrink quickly.
Harvest on a dry day. Wet soil clings to the skin and carries disease. A dry day also lets tubers dry faster after digging.
Dig with care. Loosen the soil well away from the tuber, then lift. Cuts, stabs, and bruises are the main door for rot. Anything wounded goes to quick sale, not to the barn.
Step 2: Sort Hard
Before anything goes into storage, sort every tuber in the shade.
The best group, whole, firm, clean, and undamaged, goes to long storage.
A middle group with small scratches or minor blemishes goes to short storage or early sale.
Anything cut, soft, moldy, beetle-bored, or with dark patches goes out of the barn area at once. Bury or burn it far from the storage.
I have never regretted sorting too strictly. I have often regretted sorting too softly.
Step 3: Cure Before You Store
Curing is a short rest period that lets the skin dry and small wounds begin to heal.
Spread the sorted tubers in a single layer in a shaded, airy place. Never leave them in direct sun, because the skin can scorch, and sun-scorched tubers rot faster.
Leave them for about 3 to 7 days, depending on the weather. In humid conditions, I give them a little longer.
Turn them once a day so they dry evenly.
Brush off loose soil with a dry cloth or soft brush. Do not wash and do not scrape the skin.
If a tuber has a tiny blemish that I still want to keep, I rub it with dry wood ash. If you use any registered fungicide treatment, follow the label exactly and ask your extension officer first.
Step 4: Build or Choose the Right Barn
A good barn does four things: it keeps tubers cool, dry, shaded, and well ventilated. It also keeps pests out.
Traditional tie barn. Tubers are tied with rope or fiber to vertical poles or horizontal rails, so each hangs in the air. This is a well-proven method, and it gives excellent airflow, easy inspection, and no contact between tubers.
Rack or platform barn. Tubers sit in a single layer on raised slatted racks, with space between them. It is easier to build for some farmers and works well if the layer stays thin and airy.
Heaps and pits. Some farmers store yam in heaps or in shaded ground pits. These can work for short periods in cool, dry places, but they trap heat and moisture easily and make inspection hard. I use them only for short-term holding, not for months.
Whatever style you choose, follow these rules.
Site. Choose well-drained ground with natural shade from trees or a tall roof. Avoid low places where water stands.
Roof. A high roof with a wide overhang keeps out rain and heat. Thatch is cooler than bare zinc. If you use zinc, build it high, with a ceiling or ventilation gap.
Walls. Leave the sides open or slatted so wind moves through freely. A closed room is the enemy of long storage.
Floor. Keep it dry and raised if needed. Damp soil releases moisture under the tubers all season.
Poles and racks. Use clean, sound wood. Replace anything rotten or termite-eaten before the season, and scrub and sun-dry old poles.
Rat protection. Fix smooth metal guards around support posts so rats cannot climb. Keep the surrounding area free of tall grass, rubbish, and heaps.
Termite protection. Choose termite-resistant wood and keep wood off wet ground. Ask your extension officer about safe, registered termite treatments in your area.
Step 5: Load the Barn Properly
When you tie or rack the tubers, give each one space. Tubers should not touch the ground, the walls, or each other. Hang the biggest and strongest at the lowest levels if the structure is heavy, and keep the most vulnerable stock where it is easiest to check.
Label sections by variety, field, or harvest date. I keep a simple notebook with a sketch of the barn, so I know what is in each section and when it went in.
Do not overload. A smaller, well-kept stock beats a huge, neglected one.
Step 6: Manage the Barn Month by Month
This is the part most farmers skip, and it is where long storage is won.
Weeks 1 to 4. This is the settling period. Check every few days. Remove any tuber that shows softness, mold, or smell. Early rot usually comes from hidden wounds that curing did not heal.
Months 2 and 3. This is the stable stretch if the barn is good. I inspect weekly, sniff the air, feel suspicious tubers, and clear any fallen debris. I watch the weather. If a very hot spell or heavy rain arrives, I adjust ventilation and check roof leaks.
Months 4 and 5. Dormancy begins to end in many varieties, and sprouting starts. I remove sprouts by hand when they are small, using a clean twist or a clean knife, and I check the tuber for softness. Weight loss speeds up here, so I begin selling the oldest and weakest stock first.
Month 6 and beyond. Quality drops quickly for most varieties. I aim to have sold nearly everything by then. Anything left is for seed or immediate consumption.
Controlling Sprouting
Sprouting is the clock in the barn. A sprouting tuber burns its stored food, becomes light, soft, and bitter, and rots more easily.
Keep the barn cool and shaded, because heat speeds up sprouting.
Remove sprouts early and often. Pulling them while small limits the damage, though it only delays the process.
Do not store sprouting tubers alongside fresh ones. Sell or cook the sprouted ones first.
Some farmers use registered sprout suppressants in commercial storage. If you consider this, ask your extension officer what is allowed, safe, and appropriate for food crops in your country. Do not use any product that is not clearly approved for yam.
Handling Moisture, Heat, and Air
The three barn conditions you can control are airflow, shade, and dryness.
Airflow. Keep the sides open. If you must close parts for security, leave generous gaps high and low.
Shade. Never let direct sun hit the tubers. Plant shade trees on the sunny side or extend the roof overhang.
Dryness. Fix leaks quickly. Keep rain from blowing in. Do not water the floor. If the ground is damp, raise the racks.
Temperature. A cool, steady temperature is the target. In a hot climate, a tall, shaded, windy barn is the cheapest cooling system I know.
Warning Signs of Trouble in Long Storage
Walk the barn every week and look for these.
Sour or fermented smell. Rot has started somewhere. Find it today.
Soft, wet, or sunken patches. Press gently. If it gives way, the inside may be gone.
Mold near cuts, cracks, or the head. Fungi are active.
Dark or black patches under the skin. Dry rot or nematode damage. Cut one open to check.
Rat droppings, gnaw marks, or termite trails. Pests are in the barn.
Sprouting across many tubers. Dormancy is ending. Plan to sell those quickly.
Shriveled, light tubers. Heavy weight loss. Sell sooner.
Liquid or dark stains under a section. A rotting tuber is leaking.
When you find a rotten tuber, remove it right away, check its neighbors, and discard or bury it far from the barn. If only a small part is bad, cut generously into clean white flesh and use the rest quickly, but do not return it to storage.
Planning Your Sales Around Storage
Storage only pays if you sell well. I plan like this.
Sell early-harvest and damaged tubers immediately.
Hold the best tubers for the season when supply is lowest and prices rise.
Sell in stages, so one bad month in the barn does not wipe out the whole crop.
Keep an eye on the market, and do not hold out for a perfect price when quality is dropping. A good price this week beats a dream price on tubers that are already softening.
Track how much weight you lose between harvest and sale. Subtract that loss from your expected profit, so you know the real return on storing.
What I Would Do Differently If Starting Again Today
I would build a better barn before I ever planted a bigger field. My first barn was low, hot, and half-closed, and it cost me more in rot than the whole structure would have cost to build properly.
I would be much stricter about what enters the barn. Every cut, soft, or doubtful tuber costs me twice, once in rot and once in the damage it does to its neighbors.
I would keep a barn logbook from day one. Dates, varieties, sections, losses, and sales. After two seasons, it tells me which varieties and fields store best.
I would plan my sales before I plan my storage. Knowing when I want to sell tells me how long the yam must last.
I would never again leave inspection to “when I have time.” A weekly walk is the cheapest insurance on the farm.
And I would always keep a small share of the crop in a different barn section or method, just to learn. A little experiment each year teaches more than a leaflet.
Frequently Asked Questions
How long can yam be stored?
With good harvesting, curing, and a well-ventilated barn, healthy yam of good storing varieties can last around 4 to 6 months, sometimes longer. Poor handling or heat can shorten that to weeks. Results differ by variety and local conditions.
What is the best way to store yam for a long time?
Harvest mature, undamaged tubers, cure them in the shade, and hang or rack them with space around each one in a shaded, ventilated, rodent-proof barn. Inspect weekly and remove any bad tuber at once.
Can I store yam in the house or a closed room?
It is risky. Closed rooms trap heat and moisture, which speeds up rot and sprouting. If you must, choose a cool, dry, well-ventilated room, keep tubers off the floor, and check often.
Should I refrigerate whole yam?
Not for long-term storage. Whole yam is a tropical crop and does not like cold. Cool, shaded, airy conditions are better. Cooked or cut yam can go in a fridge for a few days.
Why does my yam sprout in storage?
Because it is ending dormancy, which is natural, and heat and humidity speed it up. Keep the barn cool, remove small sprouts early, and sell sprouting tubers first.
Can I store cut or damaged yam for months?
No. Cut and damaged tubers rot fast. Sell or use them quickly. Only whole, healthy tubers belong in long storage.
Do I need chemicals to store yam?
Not always. Good field practice, curing, wood ash on tiny wounds, a clean barn, and weekly inspection prevent most losses. If you use any registered treatment, follow the label and ask your extension officer first.
The Advice Worth Bookmarking
Yam does not spoil because the months are long. It spoils because the barn was hot, the tubers were wounded, or nobody walked the rows on a Friday. Store only your best, give every tuber air, and let patience earn what the harvest rush never will.