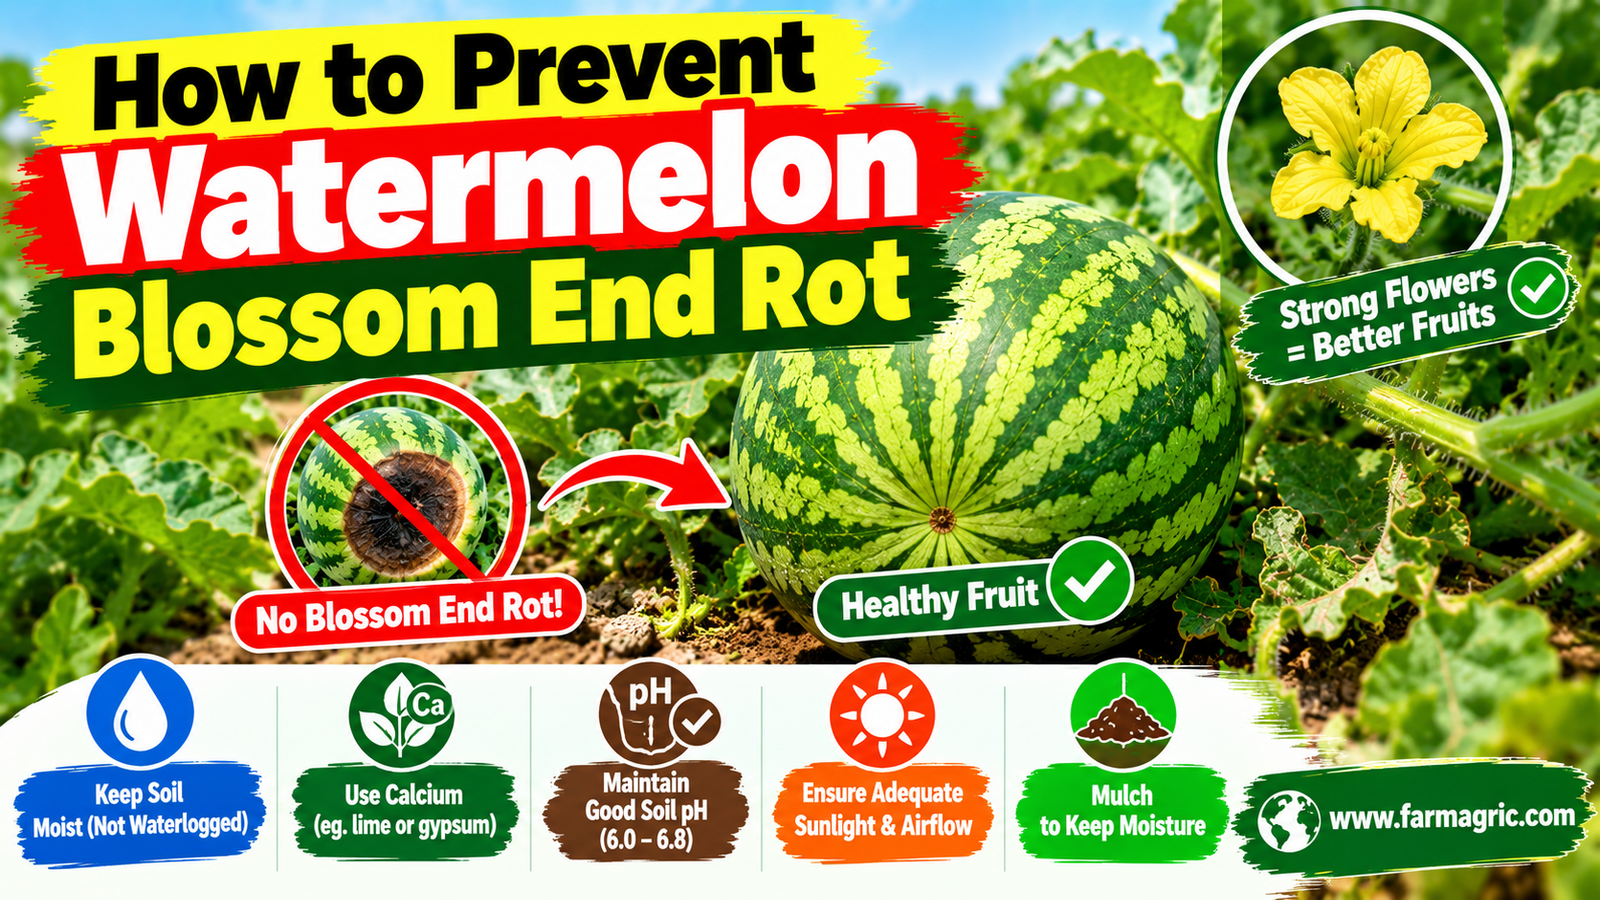
How to Prevent Watermelon Blossom End Rot
How to Prevent Watermelon Blossom End Rot
I once had a watermelon patch that was the pride of the village for the first two months. Vines everywhere, fruits swelling nicely. Then, a few weeks before harvest, I started finding melons with a dark, sunken, leathery patch on the end opposite the stem, like someone had pressed a burnt coin into them. The fruit above the patch looked perfect. I sprayed fungicide, then sprayed again, and the patches kept coming. It took me an embarrassing amount of time to learn that I was fighting a water problem with a fungus remedy. The spray was never going to work, because blossom end rot is not an infection at its root.
Here is the plain answer. Blossom end rot happens when the developing fruit does not get enough calcium at its blossom end, the part that grows fastest. In most soils there is plenty of calcium already. The real trouble is that calcium only travels into the fruit with the water the plant pulls up, so uneven watering, drought followed by flood, root damage, too much nitrogen, salty soil, or acidic soil that locks up calcium all stop it from arriving. You prevent it by keeping soil moisture steady, mulching, testing and correcting soil pH and calcium, avoiding heavy nitrogen and ammonium fertilizers, protecting the roots, and planting on well-drained soil. Fungicide will not fix it.
The short version of what I do is this. I test the soil before planting and lime or add gypsum only if the test says calcium is low, I plant on raised, well-drained beds, I mulch every row, I water on a steady schedule using the finger test, I keep nitrogen moderate once fruits set, I avoid deep cultivation near the vines, and I remove affected fruit so the plant puts its energy into healthy ones. The rest of this article explains how to recognize the problem, what most farmers get wrong, and how to put each step into practice.
What Most Farmers Get Wrong
The first mistake is spraying fungicide. The dark patch looks like a rot, so farmers treat it like a disease. Blossom end rot is a physiological disorder, and no fungicide cures it. Fungi and bacteria often move into the dead tissue later, which makes people think they were the cause.
The second mistake is dumping calcium on the field and walking away. Many soils already hold enough calcium. The plant just cannot move it into the fruit when water supply is irregular or roots are damaged. Adding more lime or calcium without fixing the water is money wasted, and too much can lock up other nutrients like magnesium and potassium.
The third mistake is uneven watering. A dry spell followed by a heavy watering or storm is the classic trigger. The fruit swells quickly, demand for calcium spikes, and the supply cannot keep up. Many farmers water when they remember and skip when they are busy.
The fourth mistake is heavy nitrogen. Too much nitrogen, especially ammonium types, pushes fast leaf growth that pulls water and calcium toward the leaves and away from the fruit. It also competes with calcium uptake at the roots.
The fifth mistake is damaging the roots. Deep hoeing or cultivating close to the vines cuts the feeder roots that take up water and calcium. Pests like nematodes and root diseases do the same.
The sixth mistake is ignoring soil pH and salt. Very acidic soil makes calcium hard to take up, and salty soil, from heavy fertilizing or poor-quality irrigation water, interferes with water uptake. A soil test would show both, but most farmers never take one.
The seventh mistake is planting in hot, dry weather without mulch. High heat and a dry soil surface make the water supply even more irregular.
Know What You Are Looking At
Blossom end rot starts as a small, water-soaked spot on the end of the fruit opposite the stem. It may appear when the fruit is still small or when it is half grown. The spot enlarges into a sunken, dry, leathery patch that turns tan, brown, then black. It can be small or cover a third of the fruit. The rest of the melon often looks normal.
Later, mold or soft rot can grow on the damaged patch, especially in humid weather, and the fruit may rot completely. Sometimes the inside under the patch is dry and corky.
Do not confuse it with other problems. Gummy stem blight and other fungal rots usually start with fuzzy growth, dark spots on leaves and stems, or lesions on the fruit surface. Sunscald gives pale, bleached, papery patches on the side facing the sun. Bacterial fruit blotch makes olive-green to brown water-soaked spots on the skin. Insect and animal damage leaves holes and bite marks. If you are unsure, take a fresh sample to your extension officer or a plant clinic.
Start With the Soil
Take a soil test before planting. It shows pH, calcium, magnesium, potassium, and salt levels. Watermelon grows best at a pH of roughly 6.0 to 6.8. If the soil is too acidic, lime according to the test result, which raises pH and adds calcium. If the soil is neutral or alkaline but calcium is low, gypsum can supply calcium without changing the pH. Do not apply either one blindly.
Work in plenty of well-rotted compost or manure before planting. Organic matter holds moisture evenly and helps roots take up nutrients steadily, which is half the battle against blossom end rot.
Choose well-drained ground. Sandy loam is ideal. In heavy soil, plant on raised beds or ridges so roots never sit in water. Waterlogged roots cannot move calcium, and neither can dry, stressed ones.
Water: The Real Key
Steady water is the single most effective control. Watermelons need consistent moisture from planting to fruit ripening, especially while the fruit is swelling.
Check the soil by pushing a finger a knuckle deep near the plant. If it is dry at that depth, water slowly and deeply. If it is wet and sticky, wait. This beats any fixed schedule, since heat, wind, and soil type change how fast the ground dries. On sandy soils you will water more often and in smaller amounts. On heavier soils, water less often but make sure it drains.
Drip irrigation is the best investment for this problem, because it gives a slow, steady supply at the root and avoids the feast-and-famine swings that cause blossom end rot. If you cannot afford drip, careful hand watering plus mulch gets you most of the way.
Mulch every row with straw, dry grass, or crop residue once the soil has warmed. It keeps moisture even, cools the roots, and holds back weeds. Black plastic mulch also works in cooler areas, but use it with drip, since plastic blocks rain.
Easing off the water a week or so before harvest improves sweetness, but do not cut water during fruit swelling. Reduce it only as the fruit reaches full size and begins ripening, and do it gradually, not by letting the field dry out suddenly and then flooding it again.
Feeding: Balanced, Not Heavy
Feed in stages. Give a balanced feed early to build a strong vine, then cut back nitrogen once flowers appear and fruits set, shifting toward potassium for fruit quality. Avoid heavy doses of ammonium-based nitrogen fertilizers, which can interfere with calcium uptake. Nitrate-based sources are gentler in this respect, though the main point is not to overfeed.
Keep potassium and magnesium in balance with calcium. Too much of one can block the others, which is another reason a soil test is worth its cost. Follow the label rates and apply fertilizer a short distance from the stem, then water it in. Do not double the dose because the vines look pale.
If your irrigation water or soil is salty, flush the soil with clean water when possible, use organic matter to buffer it, and avoid overfertilizing. Salt stress makes it harder for roots to take up water, and calcium follows water.
Protect the Roots
Watermelon roots are shallow and spread wide. Avoid deep cultivation near the vines. Weed by hand or with a very shallow hoe, and finish heavy weeding early, before the vines run. Do not walk or drive on wet soil, which compacts it.
Control root pests and diseases. Nematodes, wilt diseases, and root rots all reduce water uptake, and fruit pays the price. Rotate watermelon with cereals or legumes, and avoid planting after cucumbers, melons, or pumpkins in the same ground for at least three years. Use healthy seedlings or certified seed.
Manage Fruit Load and Vine Health
Plants carrying too many fruits at once have more demand for calcium than they can supply. Thin fruits to two or three per vine for large types, removing misshapen or damaged ones early. This also helps sweetness, as I explained in my article on watermelon sugar.
Keep the leaf cover healthy so the plant can manage water movement. Scout twice a week for aphids, whiteflies, mites, and leaf diseases, and treat early with products approved for watermelon in your area, following the label and the days to wait before harvest. A vine stripped of leaves transpires unevenly and stresses the whole plant.
Foliar Calcium Sprays: A Small Extra, Not a Cure
Some farmers spray calcium solutions directly on young fruit. Calcium does not move well from leaves to fruit, so these sprays give limited help at best, and they will not rescue a plant with water or root problems. If you want to try them, use a product approved in your area, follow the label exactly, and treat it as a small addition to steady watering, mulch, and soil correction. Do not rely on a spray to fix what the roots cannot deliver.
What to Do With Affected Fruit
Fruit that already has blossom end rot will not heal. The patch will not shrink. Remove affected fruits as soon as you see them, so the plant sends its resources to healthy ones, and so rots do not spread in the field. Bury or compost them away from the vines.
If a melon is nearly ripe and the damage is small, you can sometimes cut away the patch and eat the rest, if the flesh is firm and clean. Do not sell or eat fruit with soft, smelly, or moldy flesh. New fruits that set after you correct the water and soil conditions will usually come in clean, often within a couple of weeks.
Step-by-Step Practical Plan
If I were planning your next crop, it would run like this.
Take a soil test before planting, and adjust pH with lime, or add gypsum if calcium is low and pH is fine.
Prepare deep, well-drained beds with compost, and use raised ridges in heavy soil.
Set up drip irrigation and spread mulch before the vines run.
Water by the finger test, slowly and deeply, and keep the moisture steady from planting to ripening.
Feed balanced nutrition early, then cut nitrogen once fruits set, and avoid heavy ammonium fertilizers.
Weed shallowly and avoid cutting roots near the vines.
Thin fruits to two or three per vine, and scout twice a week for pests and disease.
Remove affected fruit promptly and bury it away from the field.
Ease off the water gradually near ripening, not suddenly.
Record rainfall, watering, and the date each affected fruit appears, so you can spot the pattern for next season.
Warning Signs to Watch For
Learn to catch it early. A small, water-soaked spot at the blossom end of young fruit is the first sign. A dark, sunken, leathery patch on half-grown fruit means the condition is established. A heavy watering or storm after a dry spell is the most common trigger, so check fruit more often afterward. Vines wilting in the afternoon heat suggest root stress or dry soil. Very lush, dark green vines with heavy nitrogen feeding raise the risk. Pale, stunted plants with damaged roots point to nematodes or disease.
If you see any of these, act that week, not next month.
What I Would Do Differently If Starting Again Today
If I were starting fresh, I would take a soil test before buying a single bag of fertilizer or a single bottle of spray. I would put in drip irrigation and mulch before planting, and I would stop watering by mood. I would keep my nitrogen moderate and stop it earlier than I thought safe, and I would thin fruits every time without exception. I would also keep a notebook of every watering, rain, and affected fruit, because the pattern in a notebook shows you the trigger that memory misses.
And I would never again pay for a fungicide to fight a water problem. Most of my losses came from swings in the soil, and none of that comes in a bottle.
FAQ
What causes blossom end rot in watermelon?
A shortage of calcium in the fruit’s blossom end, usually because uneven watering, root damage, heavy nitrogen, salty soil, or acidic soil stop calcium from reaching it. The soil often has enough calcium already.
Will adding calcium fix blossom end rot?
Only if a soil test shows calcium is truly low. In most cases, steady watering, mulch, and root care matter more. Adding calcium without fixing water supply rarely solves the problem.
Can I cure a watermelon that already has blossom end rot?
No. The damaged patch will not heal. Remove affected fruit, fix the cause, and new fruits should come in healthy.
Does fungicide work on blossom end rot?
No. It is not caused by a fungus. Fungi may grow on the damaged area later, but treating them does not cure the disorder.
Can I eat a watermelon with blossom end rot?
If the patch is small and the rest of the flesh is firm, clean, and smells normal, you can cut off the damaged part and eat the rest. Discard fruit that is soft, moldy, or smells bad.
The Advice Worth Bookmarking
Calcium rides the water. Keep the water steady and the soil balanced, and the fruit gets what it needs before you ever see a spot.